AlarmKit介绍
苹果在iOS 26中引入了全新的AlarmKit框架,这是一个令开发者们期待已久的功能。终于,我们可以在自己的应用中创建和管理系统级别的闹钟了!
AlarmKit是iOS 26新增的系统框架,允许第三方应用创建系统级闹钟。与通知不同,AlarmKit创建的闹钟会显示在系统时钟应用中,并且进行铃声强提醒。
对比EventKit的局限性
EventKit主要用于日历事件和提醒事项,虽然可以设置提醒,但有以下限制:
- 提醒不会在时钟应用中显示
- 只能存在通知或者日历中
- 用户体验不一致
- 无法利用系统闹钟的高级功能
AlarmKit的优势
- 创建系统体验一样的闹钟
- 支持所有系统闹钟功能
- 用户体验更好
代码示例
让我们通过实际代码来看看如何使用AlarmKit。
1. 请求权限
首先,需要在Info.plist中添加权限说明:
<key>NSAlarmKitUsageDescription</key>
<string>此应用需要创建闹钟来开始提醒</string>
然后在代码中请求权限:
import AlarmKit
func requestPermission() async {
    do {
        let manager = AlarmManager.shared
        let status = try await manager.requestAuthorization()
        switch status {
        case .authorized:
            print("Authorized")
        case .denied:
            print("Denied")
        case .notDetermined:
            print("Not Determined")
        @unknown default:
            break
        }
    } catch {
        print("Error requesting permission: \(error)")
    }
}
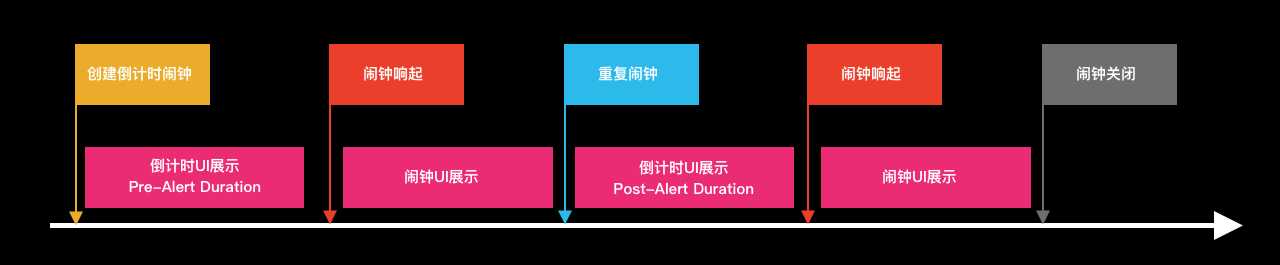
系统提供了两种闹钟,一种是倒计时闹钟,一种是指定时间闹钟。
2. 创建闹钟
AlarmKit提供了多种创建闹钟的方式,以下代码以固定日期闹钟以及倒计时闹钟为例。
创建固定日期闹钟:
typealias AlarmConfiguration = AlarmManager.AlarmConfiguration<AlarmData>
let id = UUID()
let dateComponents = DateComponents(
calendar: .current,
year: 2025,
month: 9,
day: 3,
hour: 22,
minute: 27)
let date = Calendar.current.date(from: dateComponents)!
let scheduleFixed = Alarm.Schedule.fixed(date)
let customMetadata = AlarmData()
let stopButton = AlarmButton(
text: "关闭",
textColor: .white,
systemImageName: "stop.circle")
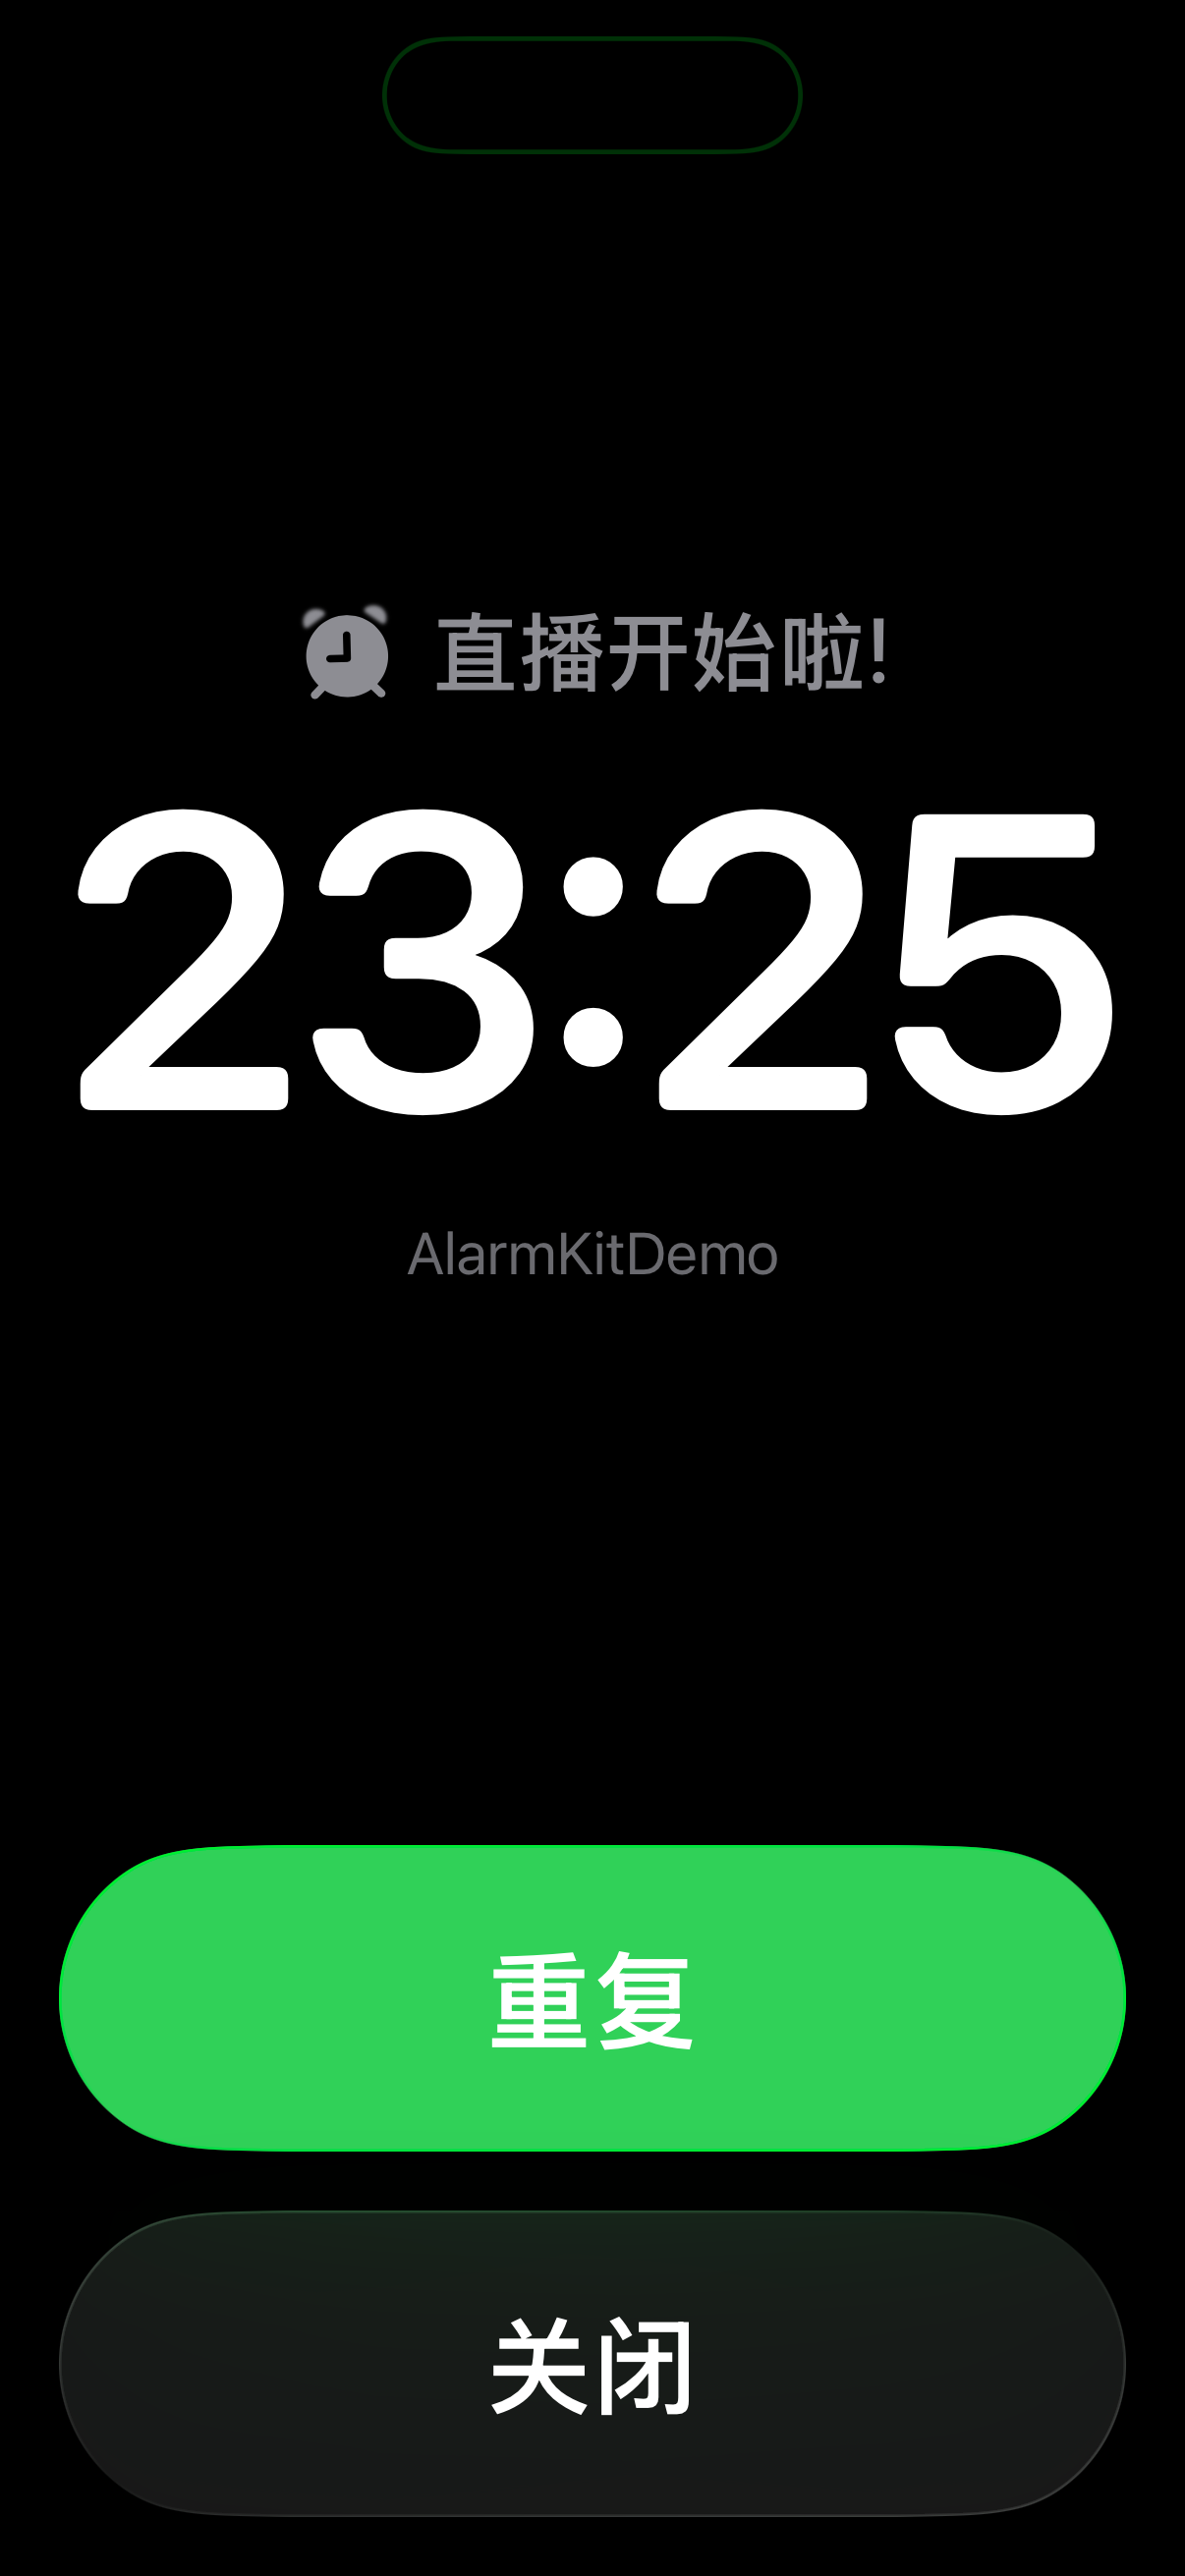
let alertContent = AlarmPresentation.Alert(title: "直播开始啦!",
stopButton: stopButton,
secondaryButton: nil,
secondaryButtonBehavior: nil)
let attributes = AlarmAttributes(presentation: AlarmPresentation(alert: alertContent),
metadata: customMetadata,
tintColor: Color.accentColor)
let alarmConfiguration = AlarmConfiguration.alarm(schedule: scheduleFixed,attributes: attributes)
try await AlarmManager.shared.schedule(id: id, configuration: alarmConfiguration)
创建倒计时闹钟:
        // preAlert: 第一次提醒时间,单位为秒
        // postAlert: 再次提醒时间,单位为秒
        let duration = Alarm.CountdownDuration(preAlert: 30, postAlert: 10)
        // 创建警报UI样式
        let stopButton = AlarmButton(
            text: "关闭",
            textColor: .white,
            systemImageName: "stop.circle")

        let repeatButton = AlarmButton(
            text: "重复",
            textColor: .white,
            systemImageName: "repeat.circle")

        let alertPresentation = AlarmPresentation.Alert(
            title: "抢票开始啦!",
            stopButton: stopButton,
            secondaryButton: repeatButton,
            secondaryButtonBehavior: .countdown)

        // 创建通知UI样式
        let pauseButton = AlarmButton(
            text: "暂停",
            textColor: .green,
            systemImageName: "pause")
        let countdownPresentation = AlarmPresentation.Countdown(
            title: "抢票时间",
            pauseButton: pauseButton)

        // 创建闹钟属性
        let attributes = AlarmAttributes<AlarmData>(
            presentation: AlarmPresentation(
              alert: alertPresentation,
              countdown: countdownPresentation),
            metadata: customMetadata,
            tintColor: Color.green)

        // 创建闹钟配置
        let alarmConfiguration = AlarmConfiguration(
            countdownDuration: duration,
            attributes: attributes)

        // 真正创建闹钟的地方
        try await AlarmManager.shared.schedule(id: id, configuration: alarmConfiguration)
为了更方便理解,我画了一张图,方便理解AlarmKit在倒计时闹钟中的流程图。
处理完创建闹钟的代码之后,你会发现依然没有出现闹钟的样式,是因为我们还没有通过widget extension定义UI。
UI的代码需要通过SwiftUI实现,代码比较多,可以参考这里示例代码的实现。
另外还要注意一点,闹钟的操作事件需要通过AppIntent来实现,这里也比较容易理解,通过alarmID来获取对应的闹钟,然后就可以进行停止、暂停、恢复、重复等操作。
struct PauseIntent: LiveActivityIntent {
    func perform() throws -> some IntentResult {
        try AlarmManager.shared.pause(id: UUID(uuidString: alarmID)!)
        return .result()
    }

    static var title: LocalizedStringResource = "Pause"
    static var description = IntentDescription("Pause a countdown")

    @Parameter(title: "alarmID")
    var alarmID: String

    init(alarmID: String) {
        self.alarmID = alarmID
    }

    init() {
        self.alarmID = ""
    }
}

struct StopIntent: LiveActivityIntent {
    func perform() throws -> some IntentResult {
        try AlarmManager.shared.stop(id: UUID(uuidString: alarmID)!)
        return .result()
    }

    static var title: LocalizedStringResource = "Stop"
    static var description = IntentDescription("Stop an alert")

    @Parameter(title: "alarmID")
    var alarmID: String

    init(alarmID: String) {
        self.alarmID = alarmID
    }

    init() {
        self.alarmID = ""
    }
}

struct RepeatIntent: LiveActivityIntent {
    func perform() throws -> some IntentResult {
        try AlarmManager.shared.countdown(id: UUID(uuidString: alarmID)!)
        return .result()
    }

    static var title: LocalizedStringResource = "Repeat"
    static var description = IntentDescription("Repeat a countdown")

    @Parameter(title: "alarmID")
    var alarmID: String

    init(alarmID: String) {
        self.alarmID = alarmID
    }

    init() {
        self.alarmID = ""
    }
}

struct ResumeIntent: LiveActivityIntent {
    func perform() throws -> some IntentResult {
        try AlarmManager.shared.resume(id: UUID(uuidString: alarmID)!)
        return .result()
    }

    static var title: LocalizedStringResource = "Resume"
    static var description = IntentDescription("Resume a countdown")

    @Parameter(title: "alarmID")
    var alarmID: String

    init(alarmID: String) {
        self.alarmID = alarmID
    }

    init() {
        self.alarmID = ""
    }
}

struct OpenAlarmAppIntent: LiveActivityIntent {
    func perform() throws -> some IntentResult {
        try AlarmManager.shared.stop(id: UUID(uuidString: alarmID)!)
        return .result()
    }

    static var title: LocalizedStringResource = "Open App"
    static var description = IntentDescription("Opens the Sample app")
    static var openAppWhenRun = true

    @Parameter(title: "alarmID")
    var alarmID: String

    init(alarmID: String) {
        self.alarmID = alarmID
    }

    init() {
        self.alarmID = ""
    }
}
最终效果如下:


闹钟自定义铃声
另外闹钟支持自定义铃声,如果不传入sound,系统将会使用默认声音:
   let sound = AlertConfiguration.AlertSound.named("Chime")
    let alarmConfiguration = AlarmConfiguration(
            countdownDuration: duration,
            attributes: attributes,
            sound: sound)
如果需要自定义声音,需要将声音文件放在mainbunle或者Library/Sounds下。
总结
AlarmKit是一个非常强大的框架,可以让我们在iOS上创建系统体验一样的闹钟,并且支持自定义铃声。我们可以通过闹钟替换到现有的日历提醒功能,给用户带来更好的体验。
参考链接
请保持转载后文章内容的完整,以及文章出处。本人保留所有版权相关权利。